Fitbit SimpleAstro Operations
(last update 2024-01-04 Version 4.3.47 - Versa 2, 5.3.47 - Versa 3 & Sense, 7.3.47 - Versa 4 & Sense 2)
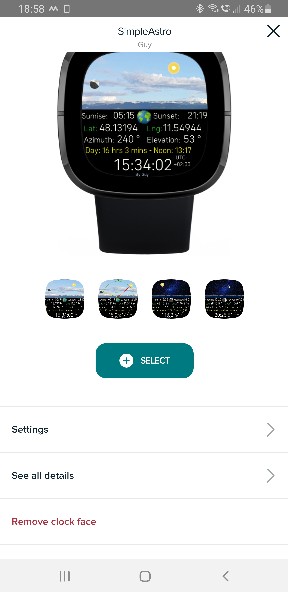
This clock face has 3 main views
Astrological view with Zodiac sign information and Analog display and stats
Digital complete date view and customisable stats
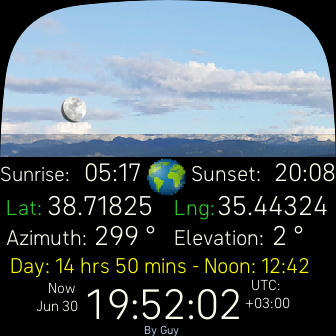
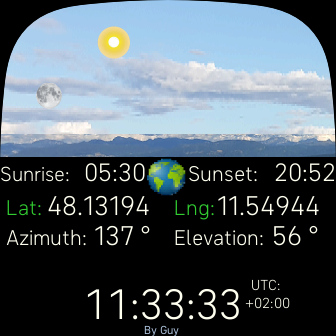
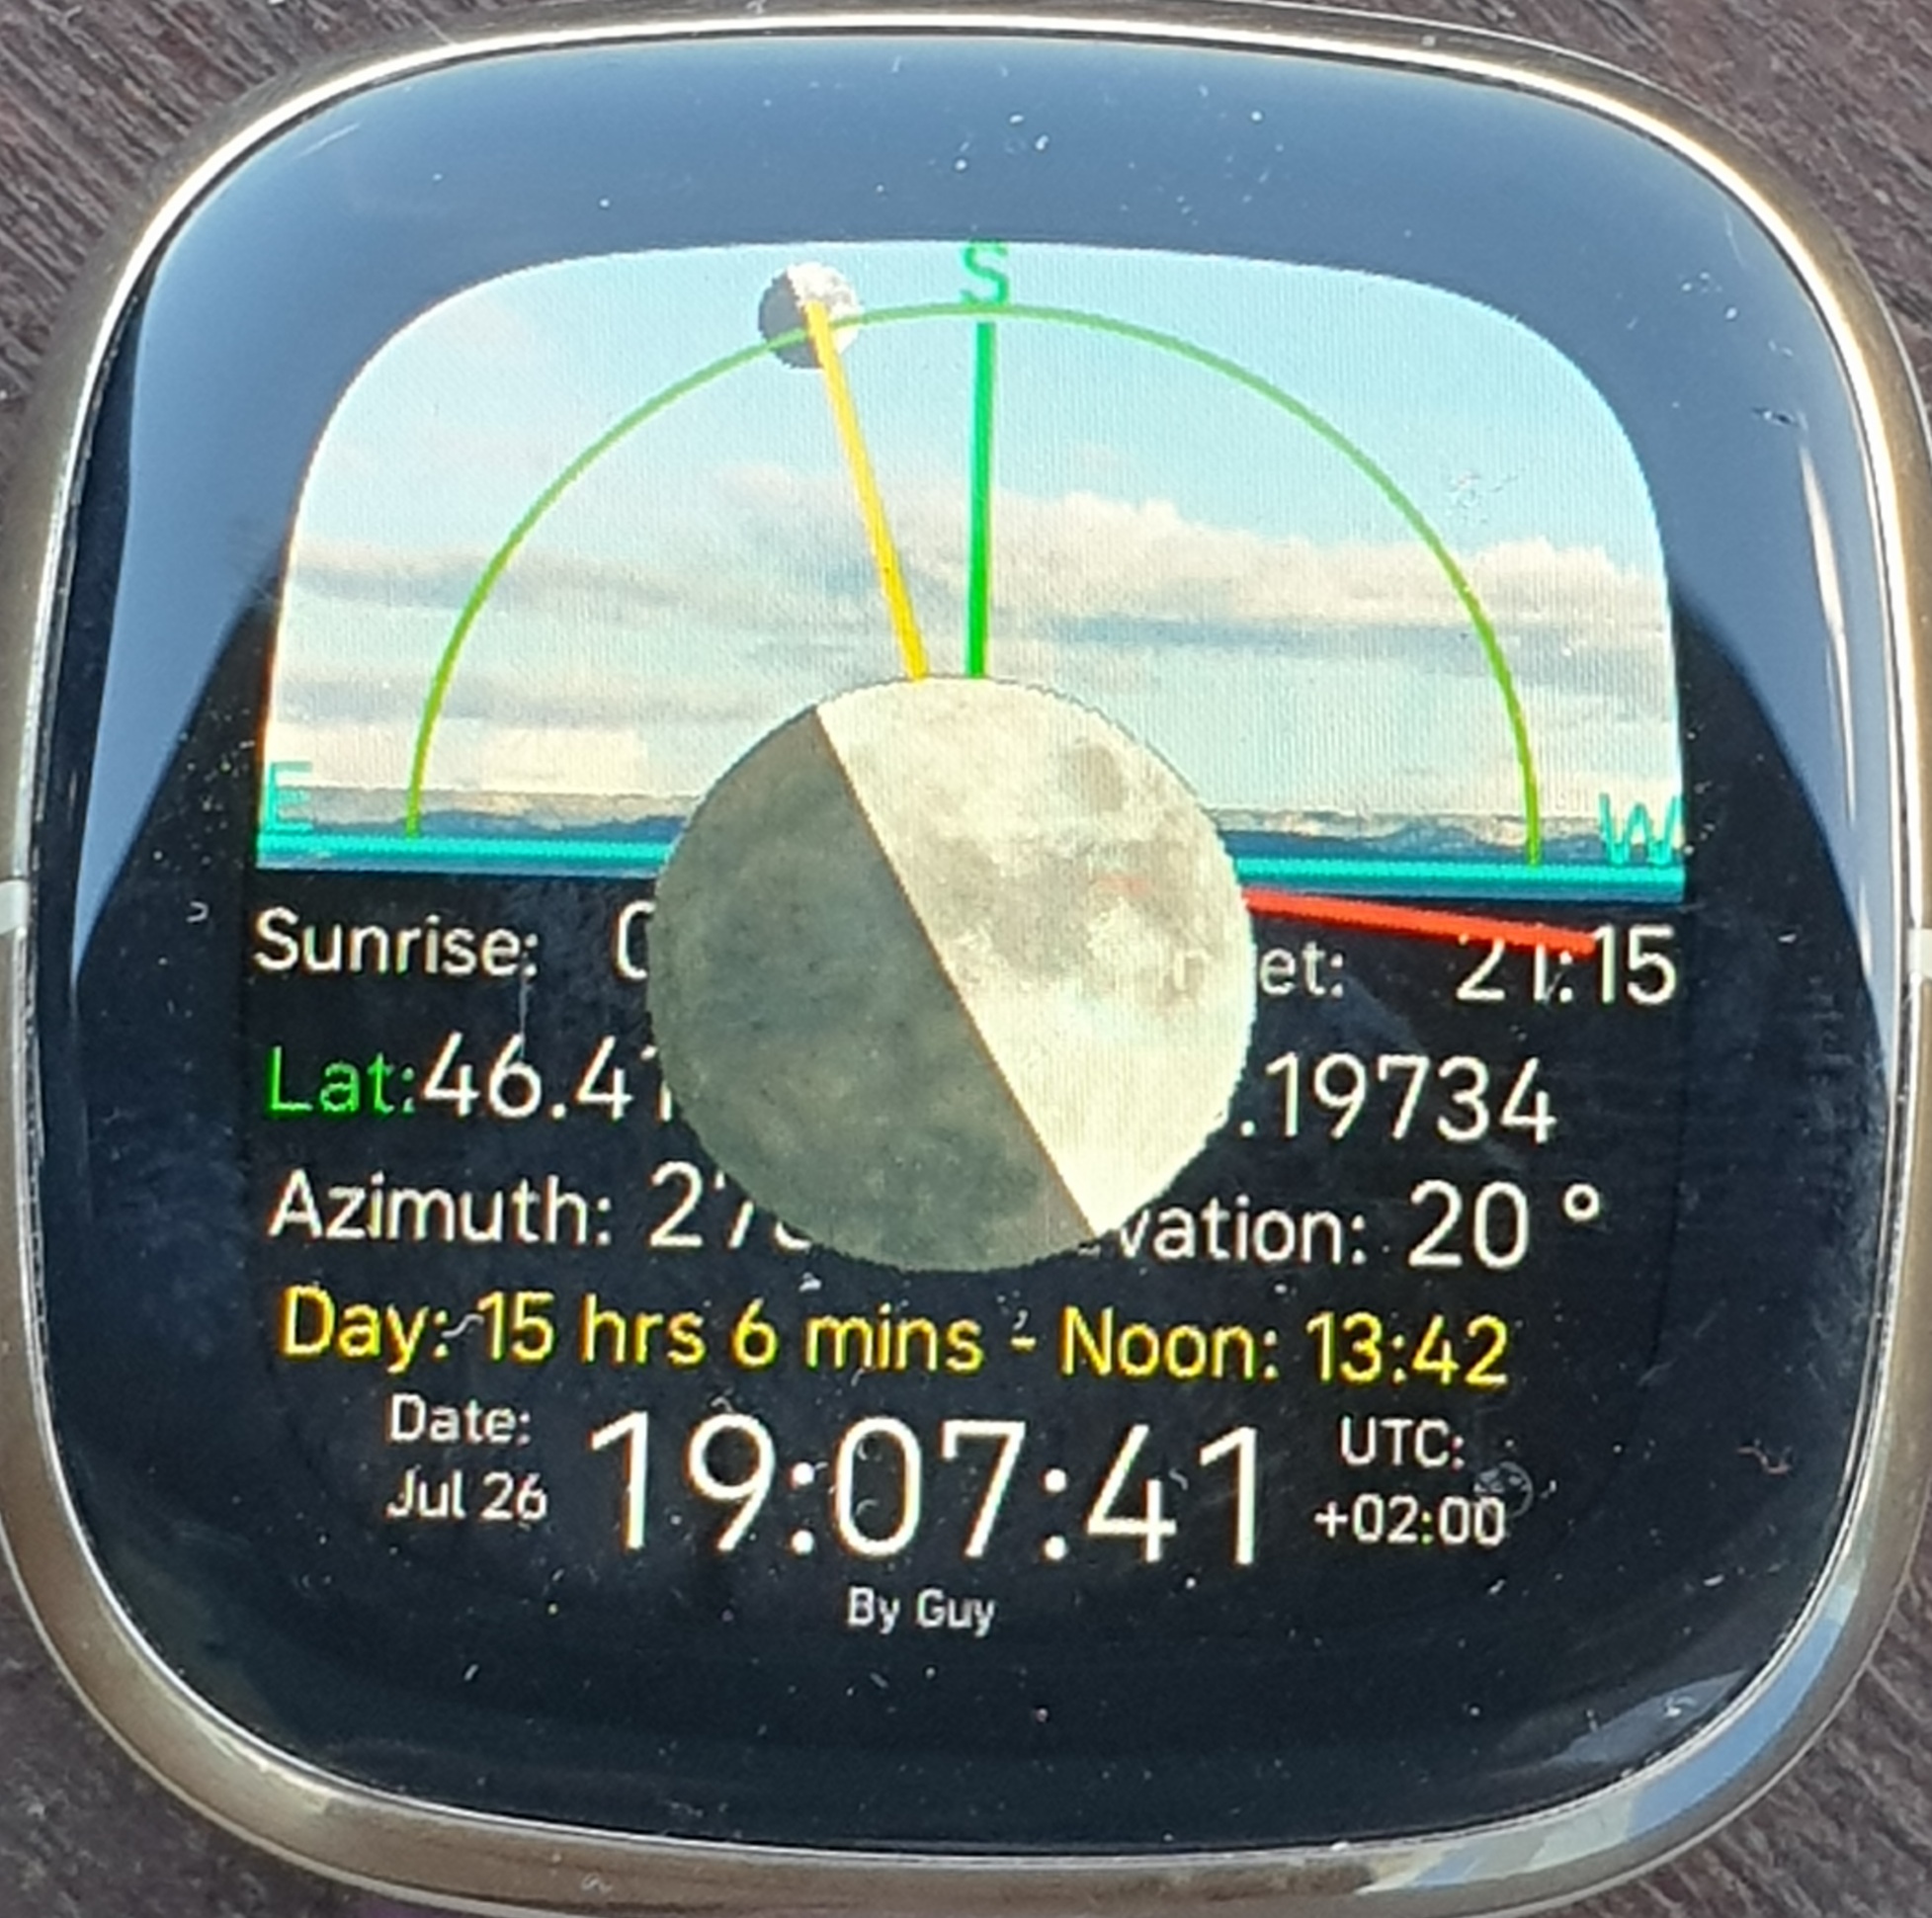
Main Astronomy view
 Example view |
 Nightfall view |
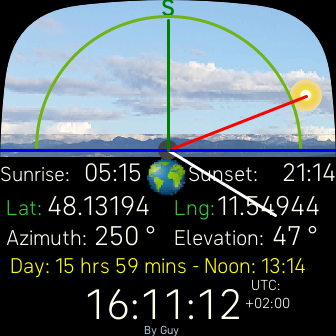
Viewing position for the Sun and Moon
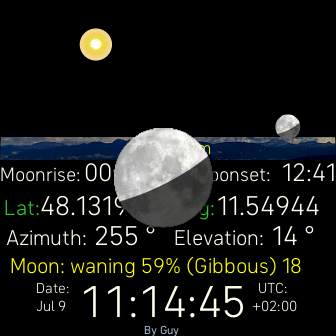
This watch face shows the current position of the Sun and the Moon [with it's phases and orientation]
based on your actual location.
It normally derives your location from your phone.
It is necessary to do this once or set it manually, see later.
It will attempt to get your location from the phone the first or any time it starts
so make sure the Fitbit App is running and phone location is set on for best results..
Thereafter, the default is no automatic update.
Tip: When using the Astro view you may want the watch timeout set to 60s
Special notes on managing location
Generally it is not necessary to have automatic updates
unless you regularly move more than 50 miles away from the initial point.
This can be configured in clock face Settings in the Gallery tile on the phone if you want
to regularly update your current location, if moving long distances, or instead just request it when needed
To manually request a location update from the clock face any time.
Double tap the bottom of the screen.
The update process works like this:
Lat and Lng will be set to 0 then values should appear, they can be
- last used values, if phone is not available, Lat and Lng will be white
- Munich values, if phone has no last used values, Lat and Lng will be white
- current values, if phone is available, Lat and Lng will be green (normal)
- remain 0 if there is a problem, Lat and Lng will be white
It is also possible to manually enter the decimal coordinates directly in the Fitbit App
if you are unable to use phone location or want to enter a specific location.
If the latter, it is a good idea to turn off phone location
this avoids it getting the current location accidentally and
over writing the chosen values.
Manually enter location or changes settings
In the Gallery tile (of the Fitbit App) - click Settings
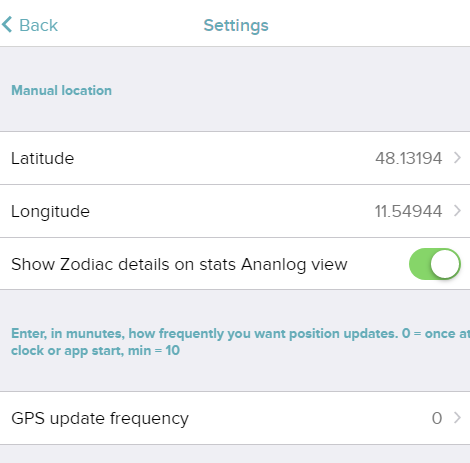
If you you change coordinates manually to another location it is best to turn off location on your phone
this will avoid getting your current location.
Tip: To quickly get your current location
Turn on phone location and double tap the bottom of the Astro display
Special notes - object placement - Astro views
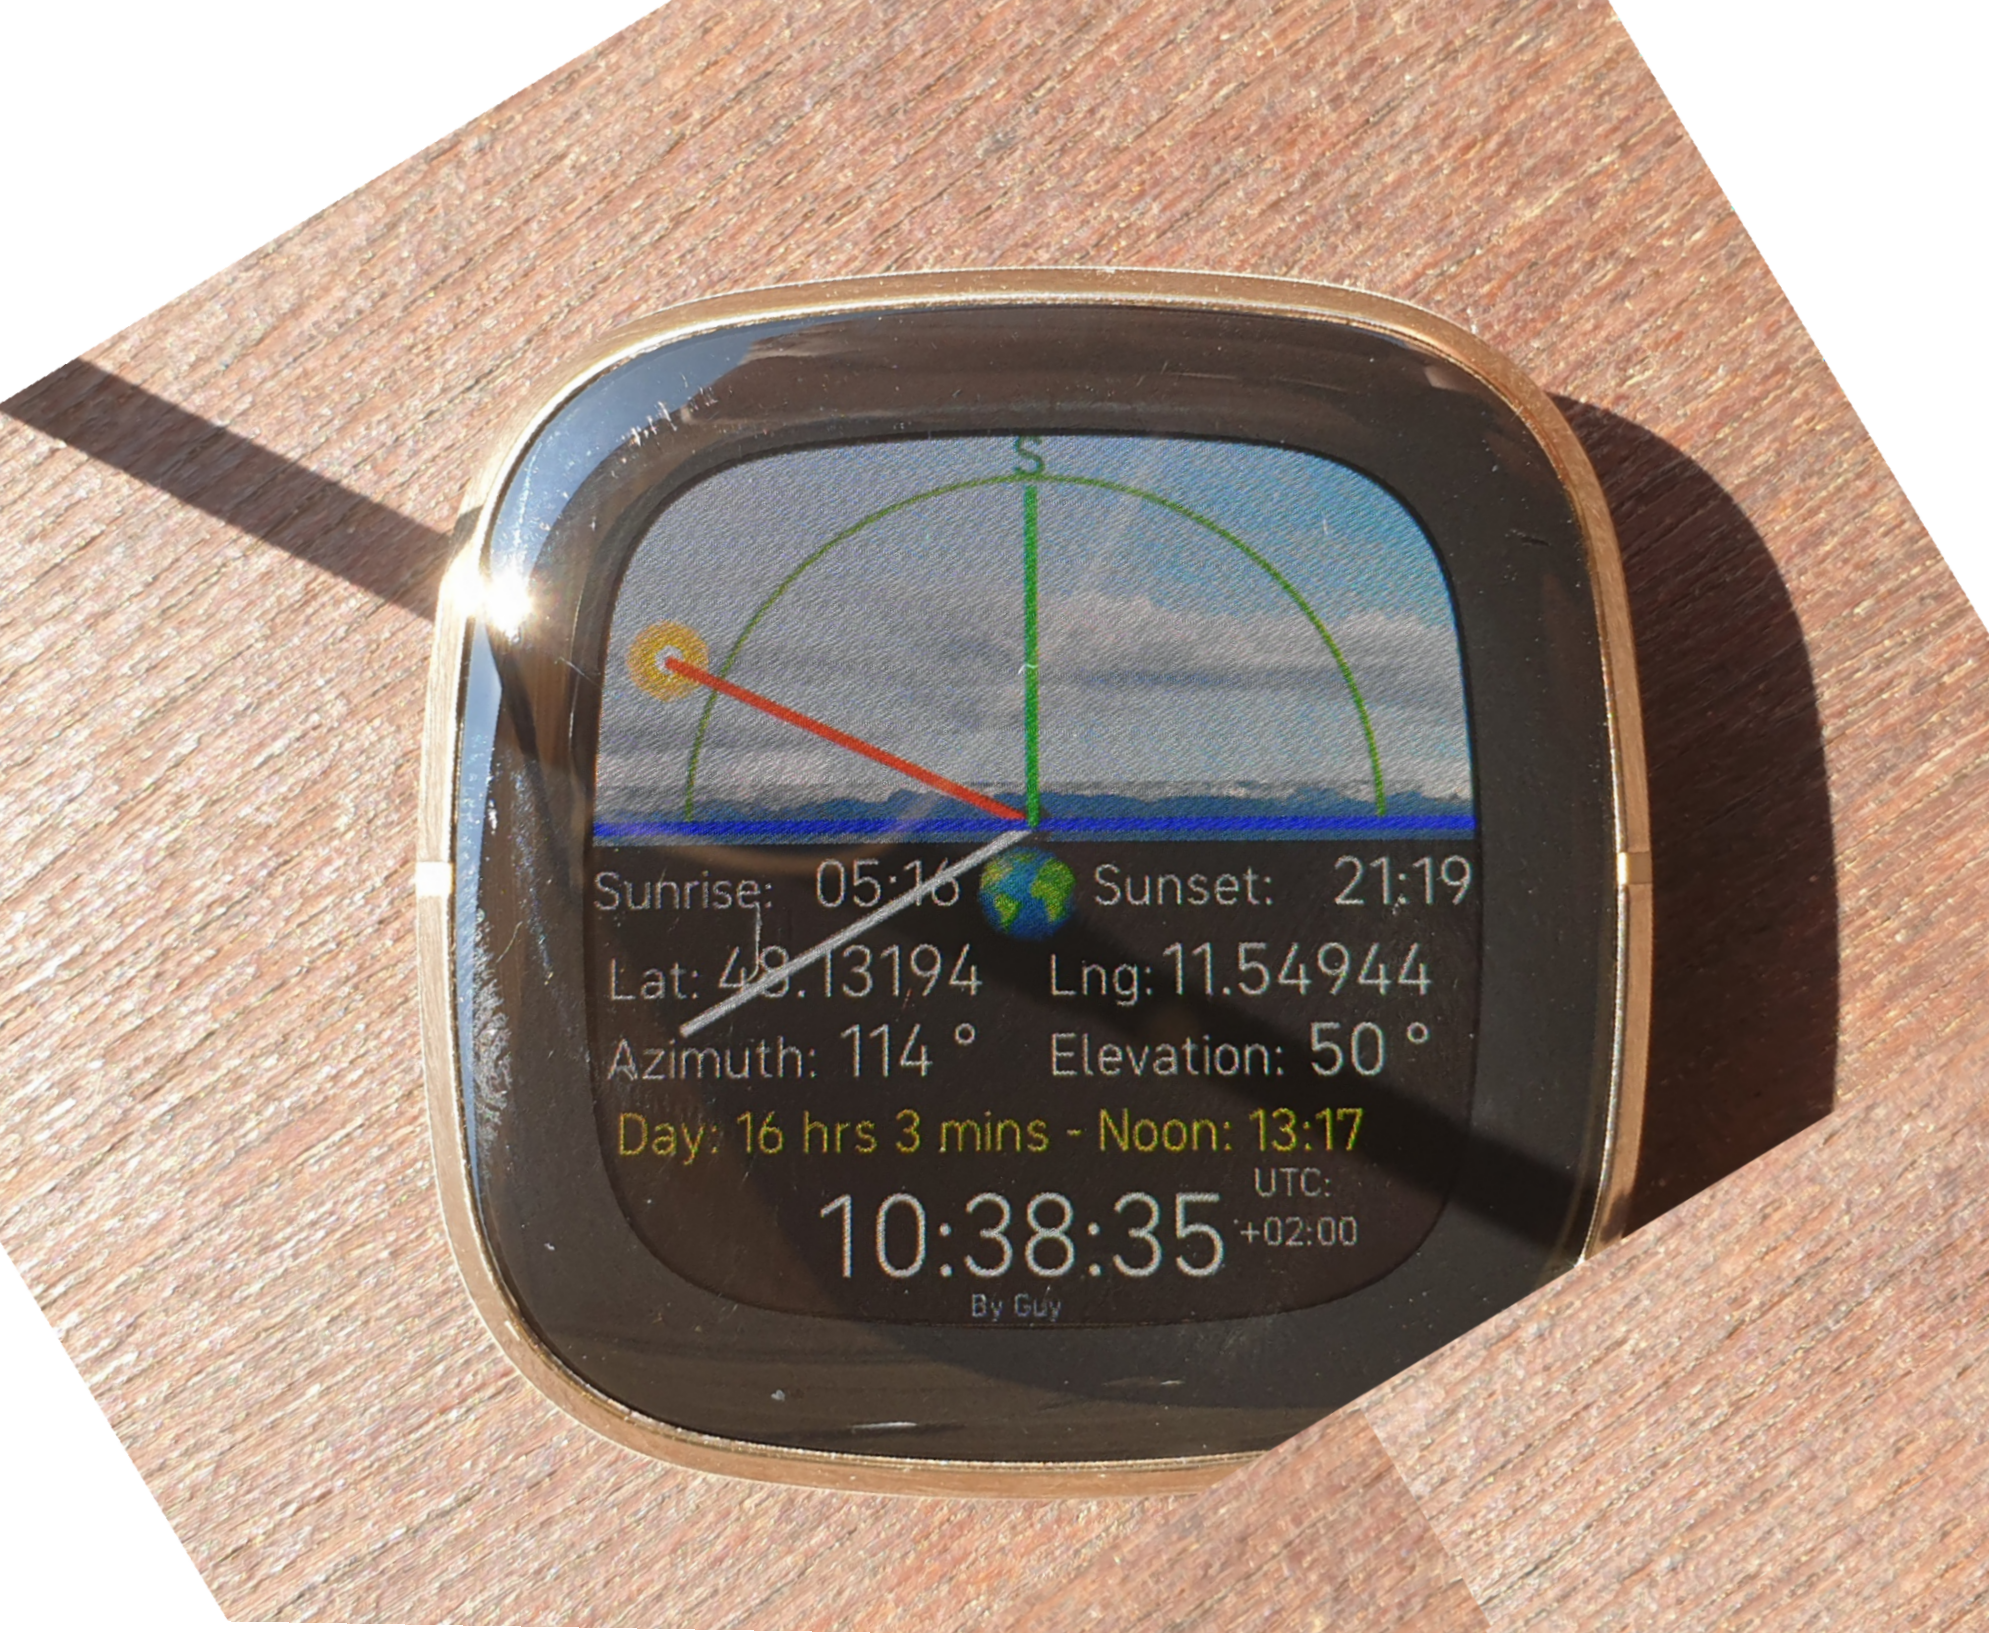
The sun and moon placement may be presented in 5 different ways depending on the mode and their position.
Generally they are placed in a Spatial view, taking into account their Azimuth and Elevation and assumes a sky view of between East (90 degrees) and West (270 degrees)
There are 2 exceptions
1. When an object is above the horizon [Elevation is positive] and it's Azimuth is out side that range, the view switches to Panoramic view to try and show the objects above the horizon.
2. When Compass mode is enabled, if the object is between 90 and 270 degrees
it will switch to a pure Azimuth mode.
To denote this true Compass mode, the line to the sun will be red and to the moon yellow
and these can then be used for navigation purposes.
If a line is white it cannot be used for navigation as it is not in "true" Compass mode
but is an indicative mode used to help locate the objects.
Objects below the horizon use Orbital mode, using Azimuth only
When the Astro view is in Demo mode it advances in Orbital mode at 30 minutes per second.
To toggle Off/On Demo mode, triple tap the sky, by default it starts on.
Using "true" compass mode
The sun or moon can both be used for navigation in "true" Compass mode.
Make sure your watch horizontal to the ground.
Using the arm of your glasses or dark glasses to create a shadow, as in a sundial,
which aligns with the red line if using a sun shadow or yellow line for a moon shadow.
like this
The green line will then point South or North as indicated.
If you don't have glasses you can use your body shadow.
Stand at right angle to your shadow and hold the watch to your chest
so that the red, or yellow, line is aligned with the shadow.
Precision may be less accurate in the polar circles and at the equator.
 Example sun mode indicator for using compass |
 Quick find moon view when out of sight |
The blue line denotes the horizon, which is well below the mountains.
This explains why the sun and moon are not immediately visible
The green dome denotes the limits of East and West on the horizontal.
Fun facts: Special notes on North / South hemisphere and world
If you live in the Northern hemisphere you are looking South and
If you live in the Southern hemisphere you are looking North.
The world is populated in different regions as follows:
- About 12% live in the Southern hemisphere
- < 4,000 people live in the Antarctic circle
- < 4,000,000 live in the Arctic circle [60% Russian]
- > ~44% of the population live north of the tropic of cancer
- < ~ 44% live around the Equator, between the 2 tropics
- mainly north of the Equator
The equatorial circumference of Earth is about 40,075 km (24,901 miles)
However, from pole to pole — the meridional circumference — Earth is only 40,008 km (24,860 miles)
Fun facts: Special notes about the moon
The shading of the moon varies depending on where you are and the sun position and should be accurately shown
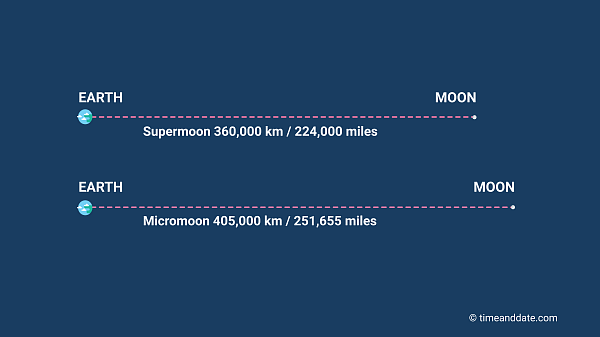
The moon also changes it's distance from earth by about 50,000 kms
When it is closest it is called "Perigee", and furthest, "Apogee
The distance between the Apogee and Perigee is a 12.5% more than the Equator circumference
The next time a Full Moon is even closer to Earth will be on November 25, 2034 .
The average distance is about 382,900 kilometres (238,000 miles) from the Moon's centre to the centre of Earth.
The distance to the moon at Perigee is about the same as going around the Earth's Equator 90 times
Next Perigee
5 Jul 2023, 00:24 - Distance: 360,149 km (223,786 miles)
Next Apogee
20 Jul 2023, 08:56 -Distance: 406,289 km (252,456 miles)
The effect of distance change as seen from Earth
The moon loses about 3 degrees per day from it's position of the previous day at the same time, this means the earth will have rotated through 3 degrees more each time the moon rises.
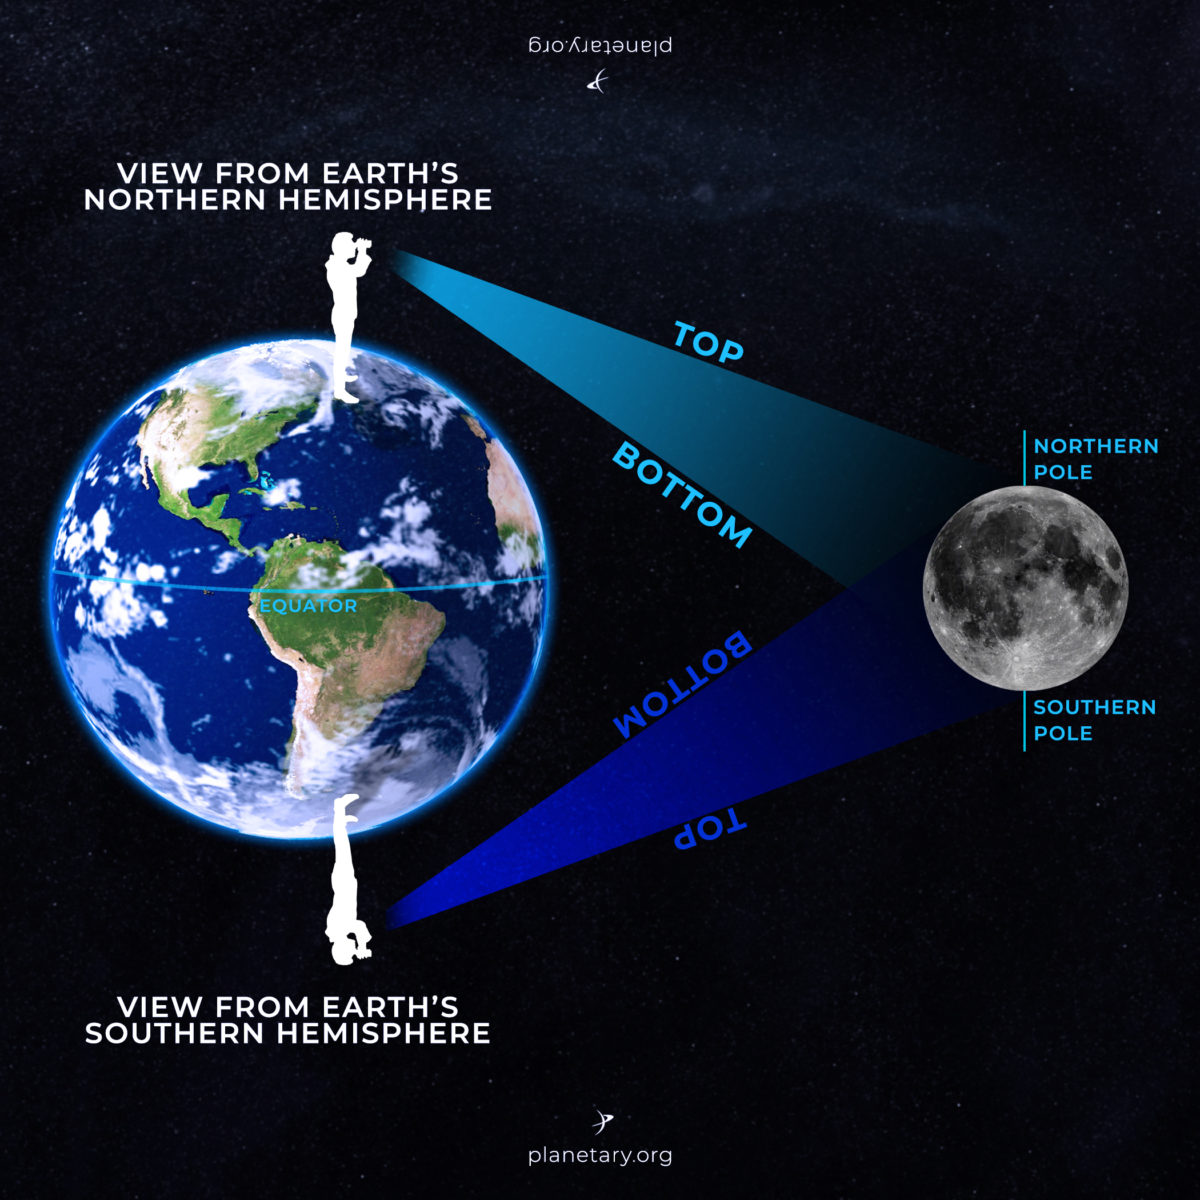
Why is the moon upside down in the southern hemisphere?
 |
Using Demo mode you can see more clearly some of the things the moon does that
you may not normally notice.

Fun facts: Special notes about the full moon and phases
- Normally you can't see the complete full moon during the day.
- However certain atmospheric conditions or polar regions can be an exception
- Because the full moon is on the opposite side of earth to the sun
-
The gravitational pull of the sun and earth combined mean that the moon is closest on a full moon.In addition this is amplified further in early January when the earth is closest to the sun.
- A Blue moon commonly refers to two full moons appearing within the same calendar month.
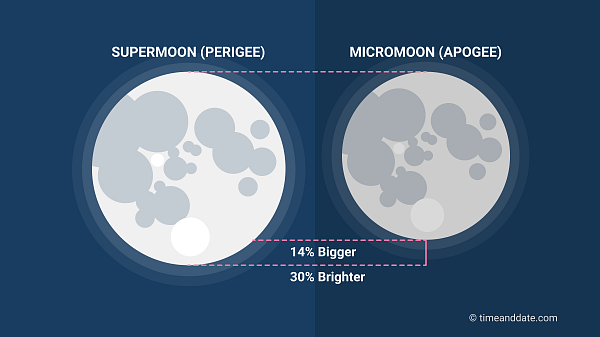
- A Supermoon occurs when the moon appears full and is near or at its closest point to Earth (Perigee).
- Not all Blue moons are Supermoons, which makes the August 30 2023 full moon even more exceptional.
- If the moon appears in the sky before the sun [or is to the west of the sun] it is waning.
- If the moon appears in the sky after the sun [or is to the east of the sun] it is waxing.
Using the various Astro screen modes
- Top part of the display
A triple tap will toggle the display in and out of Demo mode
- Bottom part of the display
the words "Lat" and "Lon" will turn white for a moment and coordinates will be zero.
See notes on location earlier
Tip: Whenever the display is in Night mode click on the central moon to enlarge it.
If you click the enlarged moon it will stay.and briefly give distance and tilt
To remove the enlarged moon click on it.
In addition, in the enlarged view it will dynamically show briefly the current relative moon size,
Where Perigee is the biggest, closest moon and
Apogee is the smallest furtherest away moon
This demonstrates the relative distance though
the moon is still shown with the same enlargement for fit and accuracy
click the following link to see how it works.
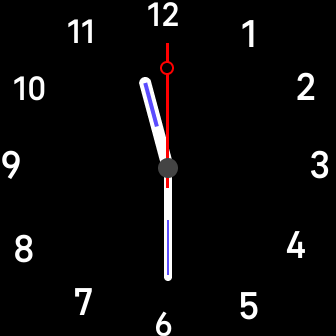 Simple Analog |
 Zodiac & Analog |
 Analog with delayed Stats |
This specialised view has 4 modes
- Analog view with no Zodiac or stats
- Analog view + Zodiac and no stats
- Analog view with delayed stats
- Analog view with instant stats
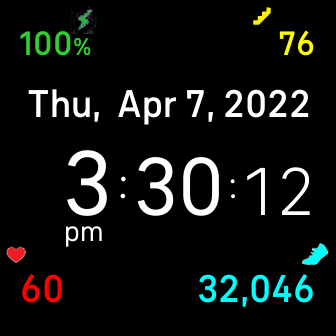
3. Digital view
Full date and time with stats
Quick Guide
Configuring Digital mode
Possible settings
12/24 hr mode - to change format
- 2 different date formats can be seen based on
"language by region/country" or location
another format for other countries
To change the time format or language, it can be done
Either in the Fitbit App, App settings
or visit https://www.fitbit.com/settings/profile
select the desired change, Submit and sync
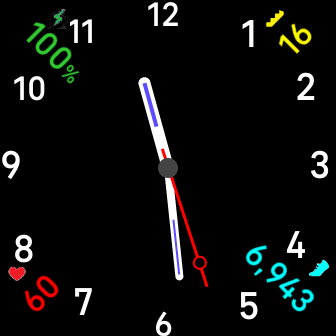
- There are four stats shown, with 3 fixed stats and one configurable
- The 3 fixed stats:
Battery [green, or low warning orange or red]
Steps [cyan]
- The top right stats is configurable [by default is Floors]
Double tap top right value - it will flash
While flashing each tap will advance to the next value of the following items:
Floors [yellow]
Calories [turquoise]
Distance [orange]
Active Zone minutes [pink]
Additional language support
German - mehrsprachige deutsche Kurzdaten
Spanish - fechas abreviadas multilingües en español
French - dates multilingues français abrégées
Italian - italiano multilingue date abbreviate
Dutch - meertalige Nederlandse verkorte data
Norway - flerspråklige norske forkortede datoer
Swedish - flerspråkiga svenska förkortade datum
Switching to Astro mode
Tap on Digital view Minute to see the Astro view and
Switching to Analog/Zodiac mode
Tap on Digital view Hour to see the Analog and Zodiac view and
Switching to Digital mode
Tap on the Astro view bottom half or Analog/Zodiac central hub to see Digitial view
Dual Analog mode
|
Configuring Dual Analog mode
- Double tap heart rate to toggle whether display behaves with only Long look
Astronomy Projections
It is possible to advance the clock by 1, 7 or 30 days to make projections.
To do this switch to Analog mode
- Tap 12 o'clock position to add 30 days
- Tap 9 o'clock position to add 7 days
- Tap 6 o'clock position to add 1 day
- Tap 3 o'clock position to reset to 0 days.
The projected offset is shown briefly in Analog and Digital views
Thereafter the modified date is shown on the Digital and Astro views.
Special watch Settings tips
For best effect try with watch settings
-
Set display timeout to 60s, keep more than 10s at least
- Turn off any status indicators
Apart from seconds, some updates happen only every minute, to speed this up
blank the screen with your hand or button press, then
button press to wake it and do an immediate update
Usage limitations tips
Use in the Polar circles may produces less accurate results
Equatorial moon display is uncertain
Restart & Version
To see the version briefly
- Switch to the Digital view [tap on the Analog background, or lower Astro half]
- Restart the clock face, start another watch operation, then return to the clock face
- Each time the clock face starts with the Digital view it will briefly show the version and language
Live celebration
Comparative picture of real moon and watch view on launch date
 Live moon |
 Watch photo |
SimpleAstro releases
(V4 - Versa 2, V5 - Versa 3, Sense, V6 - Versa 4, Sense 2)
Vx.3.47 - 2024-01-04
- Improved switching views and presentation in 12 hr mode
- Improved performance and battery display
- Better moon presentation and digital date display
- Added better switching support for Miles/Kms
Vx.3.46 - 2022-09-12
-
Improve realism of Dawn and Daybreak and add dynamic moon distance display
Vx.3.45 - 2022-07-31
- Improve Demo mode instructions
Vx.3.44 - 2022-07-26
Initial release